Sharpening your chainsaw’s chain can be done in ten minutes without special equipment other than a chainsaw file and a stand that you can make yourself. A sharp chain will extend the life of a bar and make cutting much easier. Follow these few simple steps to keep your chainsaw running smoothly by keeping its chain sharp.
The Stand
If you don’t want to buy a stand, you can make a stand that will keep the chainsaw upright while you sharpen its chain. You will need a vertical side that is only six inches shorter than the bar when the saw is set upright. The back, shorter side needs to be high enough to keep the saw from sliding when it is put upright into the stand. Both vertical sides should be attached to a base and braces on each side. On the long vertical side, put two cleats just wide enough apart for the bar and chain. It should keep the bar from moving sideways but allow the chain to be adjusted as you move to the next set of teeth to sharpen.
Basic Safety
You should still follow basic safety guidelines when sharpening the blade to avoid injury while sharpening or from improper sharpening.
–Place the stand on a bench so that you can see what you are doing.
–Place the bar vertically so that you can position the file into the “throat” of each tooth without missing the cutting edge.
–Tighten the chain to keep it from flopping loose as you sharpen it.
–To protect yourself from scrapes and cuts, wear gloves.
–Mark your starting point with carpenter’s chalk so that you can tell where to stop as you complete a rotation of the chain.
–File each tooth in the cutting direction of the file only; otherwise, you ruin your file as well as create a poor tooth profile.
–Wipe the shavings out of the file after each tooth to keep it filing smoothly.
–Sharpen the saw every one or two tanks of fuel or whenever you hit a hard surface that may dull one side when cutting.
Sharpening
–Turn the saw off, of course. If it is electric, make sure it is also unplugged.
–Place the saw in an upright position in the stand (or if you don’t have the stand, you can prop it against a hard surface…the stand just makes it easier).
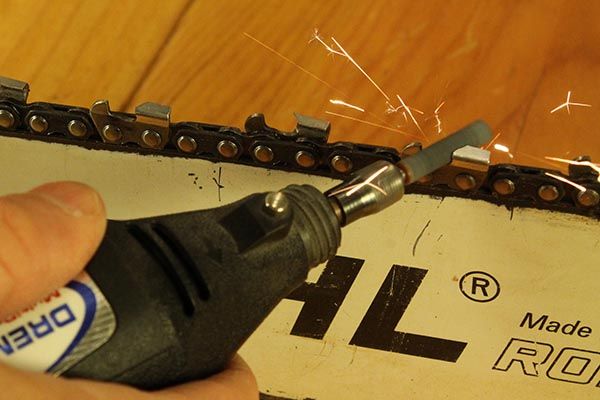
–Using a specific chain-sharpening file, make sure you have the right size for your particular chain.
–Notice the scribed lines on the top and rear of the tooth. This diagonal line is used to guide the filing. The file should be parallel to that line.
–Standing on the short side of the stand, use the carpenter’s chalk to mark a tooth that slopes up and to the left as your starting/finishing point.
–Sharpen all teeth with the same slope (up and left).
–After the complete rotation, switch hands and sharpen the teeth with the opposite slope (up and to the right).
Note that you will need to brace your non-filing hand against the bar and cleats to keep the saw from moving. It should take about four passes with the file to create a tooth that has a straight cutting edge parallel to the scribed line and sharp enough to slice a peel off your fingernail.
Trouble Shooting
–If the cutting edge is not parallel to the scribed line, you are not holding the file parallel to this line.
–If the cutting edge becomes rounded, you are wiggling the file up and down as you make the pass across the surface.
–If some teeth are shorter than others, use fewer passes on those shorter ones until they all become even.
–If the chain is damaged by a rock, use more passes to get the tooth edge sharpened. Ten or twelve strokes and double sharpening may be needed, but it may still not be as sharp as you would like once it has been damaged.
–If the teeth do not “bite” although they are sharp, the rakers may be causing the problem. Rakers can be filed down 3 or 4 times using a special guide provided by the blade manufacturer. Some people discourage filing the rakers because it can create dangerous kickback.
If you do not think you can get a straight edge, you can buy a sharpening guide that fits on the chain in a manner that will keep the file parallel to the cutting edge. There are also electric chain sharpeners on the market that can make sharpening the chain much easier for the average user. You may consider having a professional do the sharpening for you if you are not comfortable with trying to do this on your own or if the chain has already been sharpened often and may be getting close to its minimum depth.
Keeping the chain sharpened will extend the life of your bar and make your cutting task much easier. How often you need to sharpen the chain will vary. If you hit a rock right out, you may have to sharpen it within thirty minutes. If you only do light cutting with no damage, you may be able to wait 3 months to sharpen the chain. Regular maintenance is a must, so just check the sharpness of the chain each time you are ready to use the chainsaw.
albuterol 26 mg
gqap vpl zsgdb dkzt wlo pijhe ppenv
http://besttablesawsreviews.uulia.com
xenical for sale uk
buy zofran online
erectafil 2.5
generic robaxin 500mg
doxycycline 150 mg capsules
zoloft cost usa
amoxicillin 500mg buy online canada
online levitra sales
where can you get zofran
bactrim online no prescrition
antabus
tamoxifen canada over the counter
medication prednisolone 5mg
buy suhagra online india
vermox pills
colchicine
cialis generic brand
voltaren cream over the counter
Reading your article helped me a lot and I agree with you. But I still have some doubts, can you clarify for me? I’ll keep an eye out for your answers.
Thank you for your sharing. I am worried that I lack creative ideas. It is your article that makes me full of hope. Thank you. But, I have a question, can you help me?
I have read your article carefully and I agree with you very much. This has provided a great help for my thesis writing, and I will seriously improve it. However, I don’t know much about a certain place. Can you help me? https://www.gate.io/es/signup/XwNAU
However, I’m always careful to use these downloaders ethically, respecting the copyrights of
artists.